Contributor Guide
If you are on this page, you are probably thinking about contributing to a Ballet feature engineering collaboration. Welcome!
Here are the steps to develop a new feature for inclusion in a Ballet project. In this guide, we will use the real example of Predict House Prices, a feature engineering collaboration to be used for predicting the sale price of houses in Ames, Iowa, given raw data about each house.
Tip
Please ask for help on our Gitter chat!

Cloud Feature Development Workflow
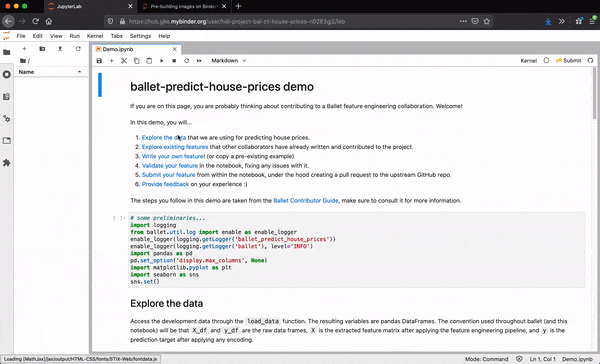
Some Ballet projects may have set up a development workflow using Assemblé, a development environment for Ballet on top of Jupyter Lab, with a hosted Jupyter Lab environment running on Binder and an in-Lab submission extension. This greatly simplifies the development workflow at the cost of some flexibility.
Launch Assemblé
Click the  link in the project’s README to launch an interactive notebook. This may take a few minutes while Binder builds the repository – grab a cup of coffee!
Work in a notebook
Begin editing the demo notebook or create a new notebook.
Authenticate with GitHub
Authenticate with GitHub by clicking the GitHub icon on the right side of
the Notebook toolbar as shown. This will initiate an authentication process
in which you will be able to log into your GitHub account and authorize
ballet-github-oauth-gateway for limited access to your account. As a
result of this secure process, the Ballet Lab extension will be able to
submit your feature on your behalf to the upstream project.
When you have successfully authenticated, the GitHub icon will change color to green.
Develop a new feature
Develop a new feature in the notebook. See Write your feature below, and the project may have prompts in the notebook to guide you. See also the Feature Engineering Guide.
Test your feature
Test your feature. See Test your feature below, and the project may have prompts in the notebook to guide you.
Submit your feature
Submit your feature.
First, select the code cell that contains the feature.
Next, locate the submission button provided by the Jupyter Lab extension, as shown in the screenshot.
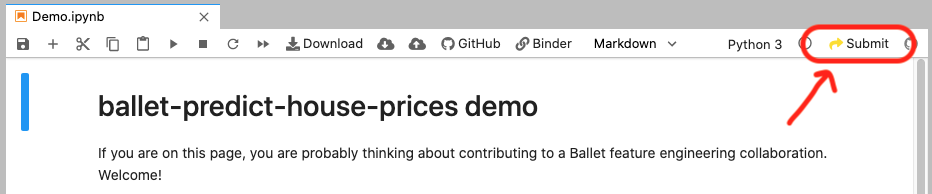
When you are ready, press the “Submit” button. You will be asked to confirm that you want to submit the feature.
If the submission succeeds, you will get a link to the pull request that is associated with your feature. If it fails, you will get an explanation of the failure.
Note
The content of the cell must be a standalone Python module, as it will be placed in an empty Python source file. This means that any imports or helper functions must be defined (or re-defined) within this cell, otherwise your submitted feature will fail to validate due to missing imports/helpers.
Local Feature Development Workflow
The most flexible and powerful development workflow is based on developing locally making heavy use of your command line. There are two parts to the workflow. First, you setup your development environment (only do this once). Second, you develop a new feature (repeat the steps every time you create a new feature).
This section discusses the use of many concepts commonly used in software development, including git, GitHub, make, and virtual environments.
Setup your development environment
Fork the project
For example, use the GitHub UI, or the hub cli.
Clone your fork
Clone your fork in your local development environment:
$ git clone https://github.com/your_user_name/ballet-predict-house-prices
$ cd ballet-predict-house-prices
$ git remote add upstream https://github.com/HDI-Project/ballet-predict-house-prices
Develop a new feature
Update and install the project
This will make the feature engineering pipeline accessible in interactive settings (Python interpreter, Jupyter notebook) and as a command-line tool.
(myenv) $ git checkout master
(myenv) $ git pull upstream master
(myenv) $ git push origin master
(myenv) $ pip install invoke && invoke install
Note
You should repeat the entirety of this step every time before you begin working on a new feature, in order to synchronize changes made to the upstream project, such as the introduction of new features by other collaborators or an update to the Ballet framework itself.
Start working on a new feature
(myenv) $ ballet start-new-feature
Starting new feature...
username [your_user_name]:
featurename [featurename]: impute_lot_frontage
2019-12-11 10:56:00,517 INFO - Start new feature successful
2019-12-11 10:56:00,517 INFO - Created src/ballet_predict_house_prices/features/contrib/user_your_user_name/feature_impute_lot_frontage.py
2019-12-11 10:56:00,517 INFO - Switched to branch your_user_name/feature-impute-lot-frontage
Starting new feature...DONE
This will create a new Python module within the project’s “contrib” directory to hold your feature. It will also try to create and checkout a new topic branch 1 for you to work on your feature.
- 1
The automatic branching requires that you are currently on the default branch and have a clean index.
The contrib directory is named like
src/<ballet_project>/features/contrib.The new subpackage must be named like
user_<github username>.The new submodule that will contain the feature must be named like
feature_<feature name>.py.
You can see the new files that have been created for you. The second file shown is the one you will want to modify.
(myenv) $ git status --short --untracked-files
?? src/ballet_predict_house_prices/features/contrib/user_your_user_name/__init__.py
?? src/ballet_predict_house_prices/features/contrib/user_your_user_name/feature_impute_lot_frontage.py
Write your feature
We call the code you write to extract one group of related feature values a
feature definition, or simply feature. Within your feature submodule, you can write arbitrary
Python code. Ultimately, a single object that is an instance of
ballet.Feature must be defined; it will be imported by the feature
engineering pipeline.
In this example, a feature is defined that receives column 'Lot
Frontage' from the data and imputes missing values with the mean of the
training data.
from ballet import Feature
from ballet.eng.external import SimpleImputer

input = "Lot Frontage"
transformer = SimpleImputer(strategy="mean")
name = "Imputed Lot Frontage"
feature = Feature(input, transformer, name=name)
Tip
For a full tutorial on feature engineering in Ballet, check out the separate Feature Engineering Guide.
Only the Python packages that are existing dependencies of the project can be used in feature engineering. Otherwise, if the feature were to be accepted, then the feature engineering pipeline would break due to a missing dependency. Usually, the dependencies of a Ballet project are the core ballet package and its own dependencies. If Ballet is installed with the [all] extra, then it additional re-exports feature engineering primitives from many common libraries. See ballet.eng.external for a summary.
If you must add a new dependency, see My feature relies on a new library, how can I add it to the project?.
Test your feature
Observe later in this guide that when you submit your feature, there will be four separate validation steps. In a Python development session, you can check two of them right away: whether the feature you have written satisfies the “feature API”, and whether the feature contributes positively to the ML performance of the feature engineering pipeline.
To validate your feature, Ballet provides a client b for easy access to
validation methods. It takes as input the feature and runs a series of tests
to make sure that the feature works correctly. You can optionally pass
specific entities and labels to use as well.
from ballet import b
b.validate_feature_api(feature)
# True
Second, the function validate_feature_acceptance takes as input the
feature object and runs an algorithm to determine whether the existing
feature engineering pipeline for the Ballet project that you are working
on performs better with or without your feature.
from ballet import b
b.validate_feature_acceptance(feature)
# True
Under the hood, it tries to automatically detect the Ballet project that you are working on and builds the existing feature engineering pipeline that is part of the project. It also loads the specific feature accepter that has been configured for your project.
To gain additional insight into any of the validation procedures, including details on why your feature may have failed to validate, enable ballet logging.
from ballet.util.log import enable
enable(level='INFO')   # or, level='DEBUG'
# [2019-12-22 10:51:30,336] {ballet: log.py:34} INFO - Logging enabled at level INFO.
Submit the feature
To submit your feature, you have two options.
Option 1: Git workflow
In this workflow, you work with git directly to commit and push your change and open a pull request with the upstream project repo.
Commit your changes
(myenv) $ git add .
(myenv) $ git commit -m "Add my new feature"
Re-run all tests
From a topic branch with your changes committed, you can run the full test suite which runs all validation steps. The additional step here compared to Test your feature is that the changes to the project structure are validated to make sure that you are contributing a new feature definition and not modifying unrelated project files.
(myenv) $ ballet validate -A
Push your branch
(myenv) $ git push origin your_user_name/feature-impute-lot-frontage
Create a pull request
Create a pull request to the project repository.
The output of the git push command will include a link to open a new
pull request on the upstream project. Navigate to the url in your browser
and open a new PR. Alternately, you can use the command-line tool hub:
(myenv) $ hub pull-request
Option 2: In-Lab Workflow
In this workflow, you use Ballet Assemblé in order to submit code directly from within your analysis notebook if you are developing in Jupyter Lab. This has the same user experience as described in the cloud feature development workflow above. Here, you should install ballet-assemble following the directions in that project. Importantly, you must authorize the extension to interact with GitHub on your behalf in one of three ways:
use the built-in GitHub OAuth functionality to obtain a new OAuth token with one click
obtain a GitHub OAuth token yourself and export the environment variable
$GITHUB_TOKENobtain a GitHub OAuth token and pass it as an option when starting JupyterLab using
--AssembleApp.github_token=mytoken.
Understanding Validation Results
Once you have developed and submitted a feature, Ballet will validate it in four steps in an isolated continuous integration environment.
Check feature API: does your feature behave properly on expected and unexpected inputs? For example, it should not produce feature values with NaNs or throw errors on well-formed data instances.
Check project structure: does your PR respect the project structure, that is, you have created valid Python modules at the right path, etc.
Evaluate feature acceptance: do the feature values that your feature extracts contribute to the machine learning goals? Depending on the configuration of the upstream project, the project may evaluate your features in a more or less aggressive manner, ranging from accepting all features to accepting only those that produce an information gain greater than some threshold.
Evaluate feature pruning: does the introduction of your feature cause other features to be unnecessary? If so they may be pruned.
Depending on the configuration of the upstream project, you will see various “bots” act on these steps. If your PR passes the first three steps, the Ballet Bot may approve and merge your PR automatically. If your PR is merged, the Ballet Bot may automatically prune features from the master branch. If your feature is rejected, you can inspect the logs produced by the Travis CI service to see what went wrong. (We are working on improving the user experience of this debugging.)